In this Excel VBA Macro Tutorial, you’ll learn the power of automation to streamline tasks like rental payment management. Whether you’re a beginner or need a refresher, these steps will guide you through creating efficient Excel macros using Visual Basic for Applications (VBA).
Hint: Download the materials for this exercise.
Introduction to Data Validation in Excel
Data validation is a foundational Excel skill, integral for maintaining accuracy in record-keeping. In this tutorial, we will focus on creating drop-down lists within your ‘Rents’ worksheet. These lists guide data entry, ensuring consistency and precision—key factors when dealing with financial records like rent payments.
Creating a Month Selection Dropdown
Begin by initiating a drop-down for the months, which will prevent errors and standardize entries.
- Select cell P3 on the ‘Rents’ worksheet, the starting point for our data entry.
- From the ‘Data’ tab on the ribbon, open the ‘Data Validation’ menu.
- In the Data Validation dialogue box, under the ‘Settings’ tab, choose ‘List’ from the ‘Allow’ options.
- Input `=$B$2:$M$2` to set your months’ range in the ‘Source’ box.
- Confirm by clicking ‘OK’, then use the fill handle to extend this dropdown to cell P38.
Dropdown for Property Names
Ensuring property names are consistently entered is just as crucial.
- Click on cell Q3 to start the property name dropdown.
- Access ‘Data Validation’ again via the ‘Data’ tab.
- In the ‘Source’ box of the dialogue, enter `=$A$3:$A$12` to reference your list of properties.
- Click ‘OK’ and drag the fill handle down to cell Q48 to duplicate the dropdown list.
- Through these steps, you’ve established a robust structure for data input, which will streamline further management tasks.
Preparing for Macro Use in Excel
The potency of macros in Excel lies in their ability to automate tasks, available exclusively in the desktop version of Excel, providing the full suite of features for comprehensive data management.
Enabling the Developer Tab
Unlock the potential of Excel macros by enabling the Developer tab. Follow these steps for Excel on Windows and Mac to access the macro features necessary for automating complex tasks.
For Excel on Windows:
- Go to ‘File’ > ‘Options’ and in the dialog box that appears, select ‘Customize Ribbon’.
- In the right pane, check the ‘Developer’ checkbox and click ‘OK’ to make the tab visible.
For Excel on Mac:
- Navigate to ‘Excel’ > ‘Preferences’ and select ‘Ribbon & Toolbar’.
- In the list that appears, check ‘Developer’ and close the preferences to apply your changes.
With these actions, you’re now ready to delve into the world of Excel macros.
Familiarization with the VBA Editor
The VBA editor is your environment for macro magic. Get to know the interface, from the Project Window to the Code Window, and prepare to code your first macro by selecting the ‘Rents’ worksheet object. [VBA programming resource].
Remember, the use of macros can elevate your productivity by automating repetitive tasks, reducing errors, and ensuring data consistency.
- Open the VBA Editor from the Developer tab by clicking ‘Visual Basic’.
- The Project Window on the left displays a hierarchical view of your workbook, including sheets and modules.
- Double-click on the ‘Rents’ worksheet object, typically named ‘Sheet1 (Rents)’, to open its Code Window. Here, you’re poised to begin programming your macro.
Defining Macro Requirements and Design
Designing a macro involves planning its triggers, functionality, and user interaction. Our goal is to populate rent payments automatically upon data entry in the rent receivables area, using the `Worksheet_Change` event.
Building the Macro
The provided VBA code snippet is designed to be placed into the ‘Rents’ worksheet module:
Private Sub Worksheet_Change(ByVal Target As Range)
Dim receivablesRange As Range
Dim paymentRow As Long
Dim paymentColumn As Long
Dim amount As Double
' Define the range where the Rent Receivables are entered
Set receivablesRange = Me.Range("P3:R38")
' Check if the changed cell is within the Rent Receivables range
If Not Intersect(Target, receivablesRange) Is Nothing Then
' Ensure the change is in the Amount column (column R)
If Target.Column = 18 Then
' Check if valid property and month are selected
On Error Resume Next ' Temporarily disable error handling
paymentRow = Application.Match(Target.Offset(0, -1).Value, Me.Range("A3:A12"), 0) + 2 ' Adjust for header row
paymentColumn = Application.Match(Target.Offset(0, -2).Value, Me.Range("B2:M2"), 0) + 1 ' Adjust for column offset
On Error GoTo 0 ' Re-enable error handling
' Check if the matches were successful
If IsError(paymentRow) Or IsError(paymentColumn) Then
MsgBox "Please select a valid property and month.", vbExclamation, "Invalid Entry"
Exit Sub
End If
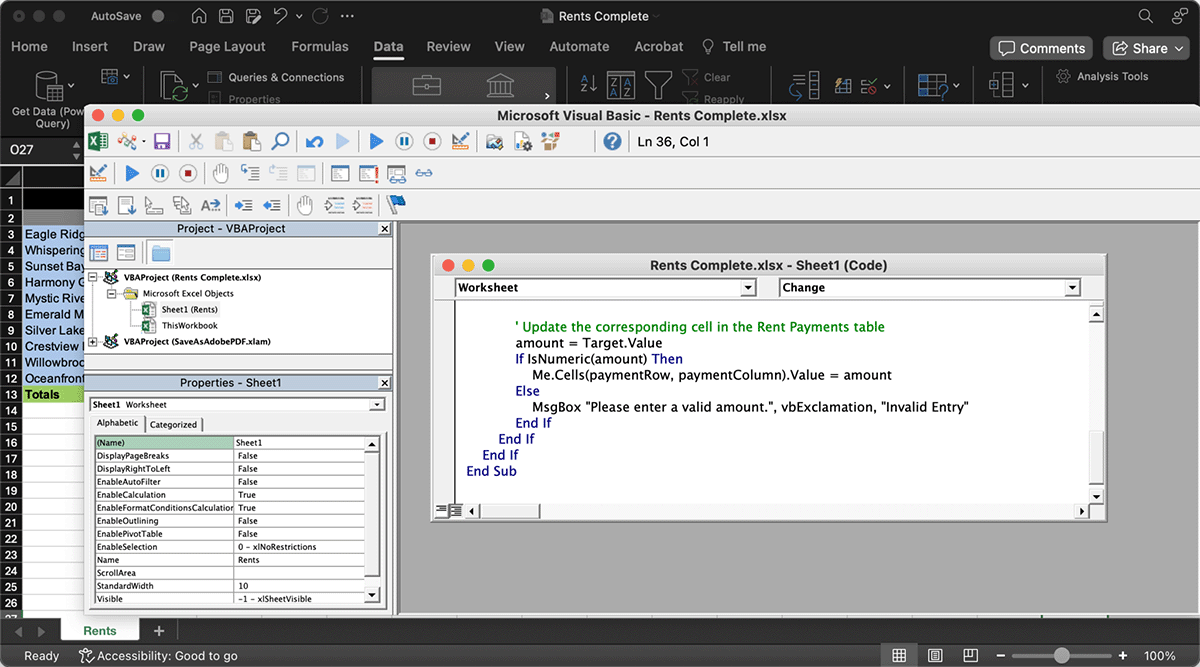
' Update the corresponding cell in the Rent Payments table
amount = Target.Value
If IsNumeric(amount) Then
Me.Cells(paymentRow, paymentColumn).Value = amount
Else
MsgBox "Please enter a valid amount.", vbExclamation, "Invalid Entry"
End If
End If
End If
End SubInstructions for Implementing the Excel VBA Macro:
- Access the ‘Rents’ sheet within the VBA Editor.
- Paste the VBA code into the Code Window associated with the ‘Rents’ sheet.
- Return to Excel and test the functionality by entering data into the Rent Receivables section.
Saving Your Workbook and Macro Security
Saving your workbook with embedded macros is crucial to retain its functionality.
- Choose ‘Save As’ from the ‘File’ tab.
- Select ‘Excel Macro-Enabled Workbook (.xlsm)’ in the ‘Save as type’ menu.
- Name your file accordingly and save it to your desired location.
Understanding Macro Security in Excel
Macros, while powerful, come with security considerations:
- Always enable macros from sources you trust to protect against potential threats.
- Familiarize yourself with Excel’s macro security settings, opting for ‘disable all macros with notification’ for a balanced approach to security and functionality.
- Communicate with recipients of macro-enabled files about the macros contained and guide them through security settings if necessary.
Conclusion
You’ve now taken significant strides in mastering Excel VBA for automating rental payment management. This tutorial has provided you with the fundamentals of creating and implementing macros, setting you on a path to further explore the capabilities of Excel automation.
Other Resources: